How to Measure Openings for Windows: A Complete DIY Guide
Accurate measurements are the foundation of a perfect window installation. Whether you’re replacing an old unit or preparing a new wall opening, a few millimeters can make the difference between a snug, energy-efficient fit and costly air leaks. This guide explains how to measure openings for both new construction and replacement windows in metric units (mm) with imperial equivalents.
Understanding Key Terms
- Rough Opening: The structural hole framed by studs and header before a window is installed — intentionally larger to allow tolerance and insulation.
- Finished Opening: The visible inside dimension after plaster, drywall, or cladding.
- Reveal: The inner edges where the frame meets the wall.
- Tolerance Gap: The small space left around the frame (typically 10–15 mm / 3/8–5/8 in) for foam and thermal expansion.
Throughout, the guide refers to aluminum (also spelled aluminium) windows for consistency with both US and EU terminology.

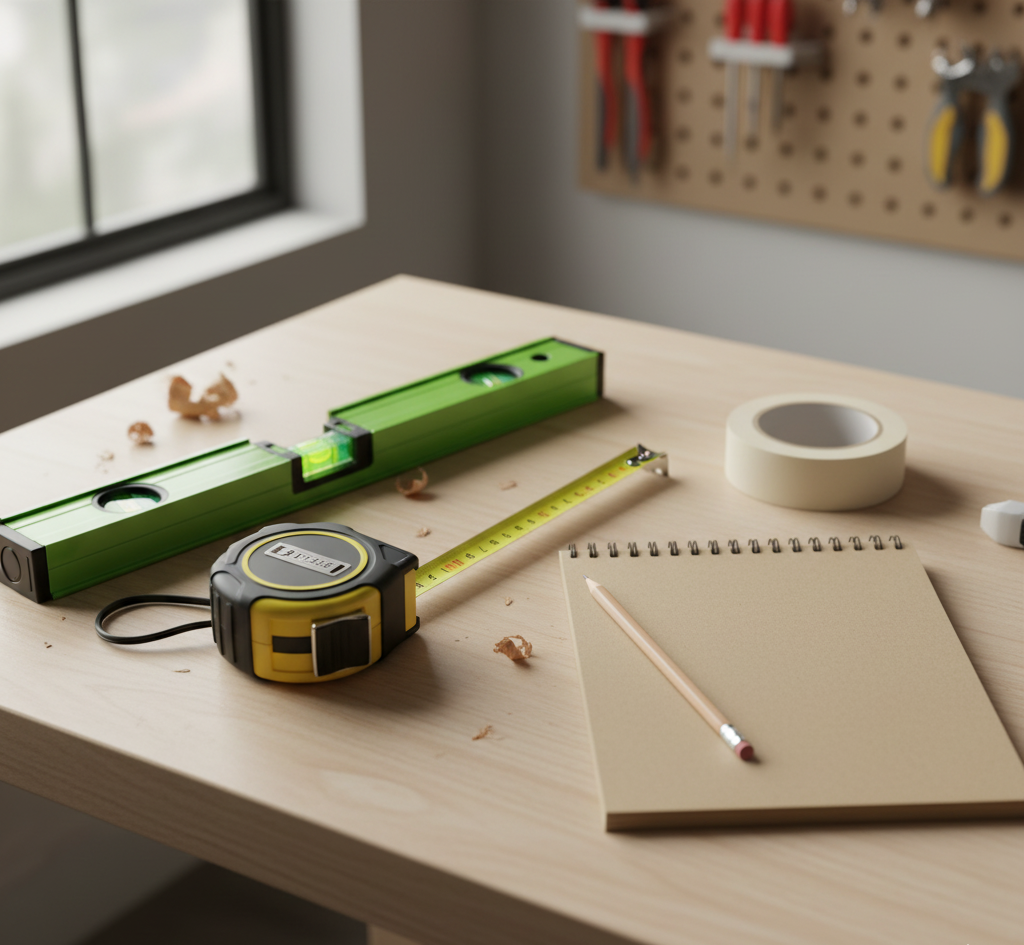
Needed tools shown on a table.
Tools You’ll Need
- Tape measure (5 m / 16 ft) or laser measurer
- Spirit level or laser level
- Notebook or measurement sheet
- Pencil and masking tape
- Optional: a helper for large openings
Step 1: Identify Your Measurement Scenario
- New Construction: Measure the rough opening (structural framing).
- Replacement / Retrofit: Measure the finished opening within an existing frame.
Step 2: Measuring Rough Openings (New Construction)
In new builds, the window is installed inside a framed rough opening. Follow these steps:
1. Measure the Width
Measure between the left and right studs at the top, middle, and bottom. Record all three and use the smallest measurement.
2. Measure the Height
Measure from sill plate to top header at left, center, and right. Use the smallest measurement.
3. Check for Squareness
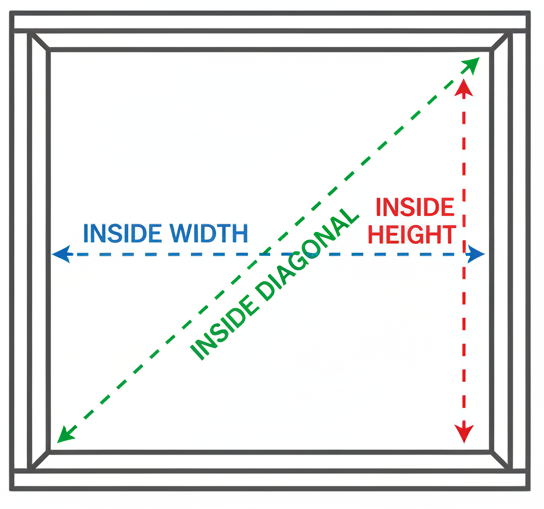
Measure diagonals corner to corner. If they differ more than 6 mm (1/4 in), note the deviation.
4. Deduct Installation Tolerance
Subtract 10–15 mm (3/8–5/8 in) from both width and height for insulation and sealant space. Example: 1200×1500 mm opening → 1185×1485 mm window.

Technical drawing of measurement lines.
Step 3: Measuring Existing Openings (Replacement Windows)
For replacement windows, measure the visible inside frame dimensions — not the old sash or trim.
1. Remove Interior Trim (If Possible)
Expose frame edges. If not possible, measure between trims and subtract 15–20 mm total for trim thickness.
2. Measure the Width
Measure from jamb to jamb at top, middle, and bottom. Use the smallest value.
3. Measure the Height
Measure from sill to head jamb at left, center, and right. Use the smallest value.
4. Measure the Depth
Frame depth determines compatible window profiles. Record the inside-to-outside dimension.
5. Check for Squareness
Measure diagonals; if they differ by more than 6 mm, note it.
Step 4: Cross-Check and Record
- Use smallest values for width and height.
- Confirm all measurements are in millimeters.
- Label each window by room and orientation.
- Note frame depth and tolerance (10–15 mm).
Step 5: Common Mistakes to Avoid
- Measuring only once.
- Ignoring uneven walls or tile thickness.
- Forgetting to subtract installation tolerance.
- Mixing up width and height.
- Switching between interior and exterior measurements inconsistently.
Step 6: Final Verification Before Ordering
- All dimensions confirmed in mm.
- Diagonal squareness verified.
- Wall depth measured.
- Tolerance gap included (10–15 mm).
Measure twice, configure with precision.
Build your product directly in the KozijnenPro Configurator — visualize your aluminium windows in real time and request an offer instantly.
 Select your profile
 Choose your color


 Pivot Doors